Mocking a REST API in React

Or, what to do when the backend API is not done when it is supposed to.

As a contractor I have heard this so many times: Relax, the backend server will be ready long before you will start to develop the front end applikation. As a contractor with tight estimates, this can be very annoying, as you know that this will slow you down, and make it difficult to meet the estimated schedule and deadlines.

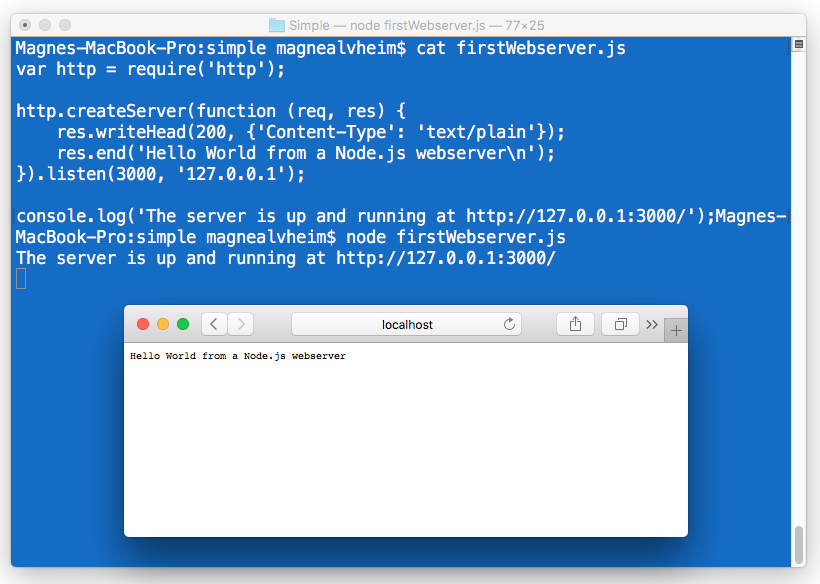
So what to do? You need to mock up something to make do. In many tutorials, they place JSON files in a server structure, wich will work using GET requests. Next step is to create a temporary server in C# or node, serving mock data, to get started.

But when browsing through a lot of conference videos, I stopped at one that had a great solution. Build a mocking API backend that feels real with MSW.js by Thor(Shenghan) Chen. MSW, or Mock Service Worker, is a small library, that creates a service worker. One of the techniques in creating PWA’s (Pprogressive Web Applications) is to set up service workers and intercept rest calls from Axios or Fetch, then you may use the local database or cache api to make the application more responsive, or even work without internet connection.

The applictation

To demonstrate the features we will create a small react CRUD application, with a list view, and a details page.

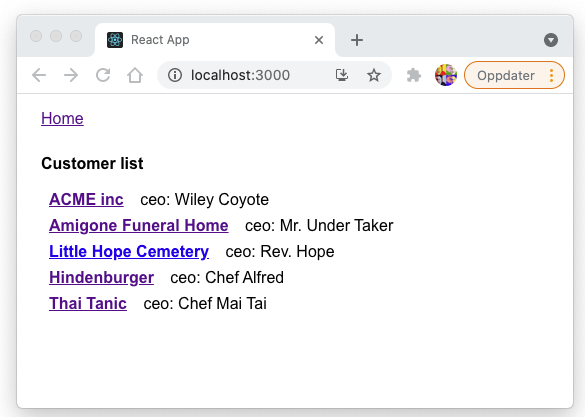
The details will look like this:

MSW to the rescue!

The MSW makes it possible to mock a backend api of both REST and GraphQL, and you can run the mocs in the browser or as a node server. No need to create a mock server to get started. All the code you need will be created inside the react application, and it is easy to set it up so it only mocks when using the IDE. This is also a great feature, because now you dont have to change anything when deploying to test or production.

So we will now create a small React application, and install msw using the following steps:

  • Create a new React application
  • Add the MSW library
  • Install the MSW service worker in the public directory
  • Add the react router to the project
  • Create a Mock dir
  • Let the application only start MSW service worker, when in Development mode.
npx create-react-app explore-msw
cd explore-msw
npx install msw --save-dev
npx msw init ./public
npx install react-router-dom
npm install

Now we have small project. Edit the index.js file and the lines for starting the msw serviceworker before the ReactDom.Render. Check the existence of mockServiceWorker.js is located in the public directory.

import React from 'react';
import ReactDOM from 'react-dom';
import './index.css';
import App from './App';

// Start the msw serviceworker when in dev mode
if (process.env.NODE_ENV === 'development') {
  const { worker } = require('./mocks/browser')
  worker.start()
}

ReactDOM.render(
  <React.StrictMode>
    <App />
  </React.StrictMode>,
  document.getElementById('root')
);

Create the Mocking files

To mock data, we need to create a folder \src\mock. In this folder we create two files

browser.js
This file instantiates the serviceworker, it loads handlers for handling all the mocked requests

import { setupWorker } from 'msw'
import { handlers } from './handlers'

export const worker = setupWorker(...handlers)

handlers.js
In this file, you import handlers from all the files mocking requests:

import { customerDetailsMockHandler } from "../pages/customerdetails/customerDetailsMockHandler";
import { customersListMockHandlers } from "../pages/customerslist/customersListMockHandlers";

export const handlers = [
    ...customersListMockHandlers,
    ...customerDetailsMockHandler
]

The mocks

In this small example, we create a small crud application, with two forms, on listing customers, and a detail form for CRUD. We create two more folders for these components and their respective moc files:

/src/customerdetails
/src/customerslist

/src/customerslist/customersListMockHandlers.js
This file mocs a GET request, and simply returns a const array.

import { rest } from 'msw'

const CUSTOMERS = 
    [
        { id: 1, name: 'ACME inc', ceo: 'Wiley Coyote' },
        { id: 2, name: 'Amigone Funeral Home', ceo: 'Mr. Under Taker' },
        { id: 3, name: 'Little Hope Cemetery', ceo: 'Rev. Hope' },        
        { id: 4, name: 'Hindenburger', ceo: 'Chef Alfred' },
        { id: 5, name: 'Thai Tanic', ceo: 'Chef Mai Tai' }
    ]
    
export const customersListMockHandlers = [

    rest.get('/customerlist', (req, res, ctx) => {
        return res(
            ctx.json(CUSTOMERS)
        )
    })
]

/src/customerdetails/customerDetailsMockHandler.js
This mock, is more complicated, and mocs GET, POST and DELETE.

Note use of parameters in the GET and DELETE requests, that picks up values passed with the request. This example will return OK if id is ‘1’, and otherwise error.

The POST request uses JSON.parse on req.body to get the passed parameters.

import { rest } from 'msw'

export const customerDetailsMockHandler = [

    // Handling GET requests
    rest.get('/customer/:id', (req, res, ctx) => {
        
        const { id } = req.params

        if (id === '1') {
            return res(
                ctx.json({ id: 1, name: 'ACME inc', ceo: 'Wiley Coyote' })
            )
        } else {
            return res(
                ctx.status(404),
                ctx.json({
                    errorMessage: `Customer not found`,
                }),
            )
        }   
    }),

    rest.post('/customer', (req, res, ctx) => {

        const customer = JSON.parse(req.body)

        if ((!customer.name) )
            return res(
                ctx.status(403),
                ctx.json({
                    errorMessage: `Name is empty`,
                }),
            )

        return res(
            ctx.json({
                ...customer, customerId: !customer.customerId ? '21' : customer.customerId
            })
        )
    }),
    
    rest.delete('/customer/:id', (req, res, ctx) => {

        const { id } = req.params

        if (id === '1') {
            return res(
                ctx.json({
                message: `Customer deleted`,
                })
            )
        } else {
            return res(
                ctx.status(404),
                ctx.json({
                    errorMessage: `Customer not found`,
                })
            )
        }
    }),
]

With this done, the application will now return mocked values on request. To use this we create two pages/components. To use these pages we first change the App.js.


App.js

Lets make use of the router, and create a small menu (currently only link to one item, home).

Below we setup a switch to the two components in the solution. We use Route to connect the URL to a component. Note that the CustomerDetails needs a parameter.

import {BrowserRouter as Router, Switch, Route, Link} from "react-router-dom";
import './App.css';

import {CustomerDetails} from "./pages/customerdetails/CustomerDetailsComponent";
import {CustomersList} from './pages/customerslist/CustomersListComponent';

function App() {
  return (
    <Router>
      <div>
        <div>
          <span><Link to="/">Home</Link></span>        
        </div>
        <div>
          <Switch>
            <Route path="/customerdetails/:customerId" render={(props) => <CustomerDetails {...props.match.params} />} />
            <Route path="/">
              <CustomersList />
            </Route>
          </Switch>
        </div>
      </div>
    </Router>
  );
}

export default App;


/src/customerslist/CustomersListComponent.js

In this file,

import { useEffect, useState } from "react"
import { NavLink } from "react-router-dom"

export const CustomersList = (props) => {

    const [isloading, setIsloading] = useState(false)
    const [errorMessage, setErrorMessage] = useState('')
    const [customers, setCustomers] = useState([])

    async function fetchCustomers() {

        setIsloading(true)
        setErrorMessage('')

        const fetchResult = await fetch(`/customerlist`, { method: 'GET' })

        const result = await fetchResult.json()

        if (fetchResult.ok) {
            setCustomers([...result])
            setIsloading(false)
            return;
        } else {
            setIsloading(false)
            setErrorMessage(result.errorMessage)
        }
    }

    useEffect(() => {       
        fetchCustomers();           
    }, [])

    if (isloading)
        return (<div>loading data</div>)
    else if (errorMessage)
        return (<div>something bad has happened: {errorMessage}</div>)
   else return (
        <div>
            <h1>Customer list</h1>
            {customers.map(function (item, i) {
                return (
                    <div key={i}>                        
                        <NavLink to={`/customerdetails/${item.id}`}>
                            <b>{item.name}</b>
                        </NavLink>
                        &nbsp;
                        <span>ceo: {item.ceo}</span>
                    </div>
                )
                    
                })
            }
        </div>
    )
}


/src/customerdetails
/CustomerDetailsComponent.js
The detailscomponent has input fields for editing data, and a row of buttons on the bottom. To keep this file short, I have created a custom hook called useCustomerDetails. This hook encapsulates all logic.

import { useCustomerDetails } from "./useCustomerDetails"

export const CustomerDetails = (props) => {

    const {
        isloading, errorMessage, message, customer, fetchCustomer,
        clear, postCustomer, deleteCustomer, formValueOnChange } = useCustomerDetails(props)
    
    const spanStyle = {
        width: "100px",
        display: "inline-block"
    }

    if (isloading)
        return (<div>loading data</div>)
    else if (errorMessage)
        return (<div>something bad has happened: {errorMessage}</div>)
    else
        return (
            <div>
                <div>
                    <span style={spanStyle} >Id</span>
                    <input
                        data-testid="id" id="id" name="id"
                        value={customer.id}
                        onChange={formValueOnChange}
                    />
                </div>

                <div>
                    <span style={spanStyle} >Company</span>
                    <input
                        data-testid="name" id="name" name="name"
                        value={customer.name}
                        onChange={formValueOnChange}
                    />
                </div>

                <div>
                    <span style={spanStyle} >CEO</span>
                    <input
                        data-testid="ceo" id="ceo" name="ceo"
                        value={customer.ceo}
                        onChange={formValueOnChange}
                    />
                </div>
                <div>
                    <button name="get" onClick={async () => await fetchCustomer(customer.id)}>Get customer</button>&nbsp;
                    <button name="clear" onClick={clear}>Clear fields</button>&nbsp;
                    <button name="save" onClick={async () => await postCustomer()}>Save</button>&nbsp;
                    <button name="delete" onClick={async () => await deleteCustomer(customer.id)}>Delete</button>&nbsp;
                </div>
            </div>        
        )
}


/src/customerdetails/useCustomerDetails.js

This custom hook encapsulates state, and routines interfacing the rest api. Note that data for the input fields is using the customer state, which will contain an object after data is fetched.

import { useEffect, useState } from "react"

export const useCustomerDetails = (props) => {

    const [isloading, setIsloading] = useState(false)
    const [errorMessage, setErrorMessage] = useState('')
    const [message, setMessage] = useState('')
    const [customer, setCustomer] = useState({})

    const initializeStatus = () => {
        setIsloading(true)
        setErrorMessage('')
        setMessage('')
    }

    const fetchCustomer = async (id) => {

        initializeStatus()

        const fetchResult = await fetch(`/customer/${id}`, { method: 'GET' })

        const result = await fetchResult.json()

        if (fetchResult.ok) {
            setCustomer({ ...result })
            setMessage('Customer loaded from rest api')
            setIsloading(false)
            return;
        } else {
            setIsloading(false)
            setErrorMessage(result.errorMessage)
        }
    }

    const postCustomer = async (customer) => {
        
        initializeStatus()

        const fetchResult = await fetch('/customer', {
            method: 'POST',
            body: JSON.stringify(customer)
        })

        const result = await fetchResult.json()

        if (fetchResult.ok) {
            setCustomer({ ...result })
            setMessage(result.message)
            setIsloading(false)
            return;
        } else {
            setIsloading(false)
            setErrorMessage(result.errorMessage)
        }
    }

    const deleteCustomer = async (id) => {

        initializeStatus()

        const fetchResult = await fetch(`customer/${id}`, {
            method: 'DELETE',
        })

        const result = await fetchResult.json()

        if (fetchResult.ok) {
            setCustomer({ ...result })
            setMessage('Customer loaded from rest api')
            setIsloading(false)
            return;
        } else {
            setIsloading(false)
            setErrorMessage(result.errorMessage)
        }
    }

    useEffect(() => {
        fetchCustomer(props.customerId);
    }, [props.customerId])

    const formValueOnChange = (e) => {
        console.log(e.target.name, e.target.value)
        setCustomer({ ...customer, [e.target.name]: e.target.value })
    }

    const clear = () => setCustomer({ id: '', name: '', ceo: '' })

    return { isloading, errorMessage, message, customer, fetchCustomer, clear, postCustomer, deleteCustomer, formValueOnChange }

}

To run the application, you enter “npm start” in the terminal, point your browser to “localhost:3000”, press F12 to display develeoper tools, click on the “Network” tab. You will se something like below:

Application running with developer tools open.

You can inspect the mocked network requests (“[MSW]”), and they are just like ordinary fetch requests.

In my company Ulriken Consulting, we all work as consultants. We have several meetup groups, were we meet to discuss and play with technologies. I co-run the Front-End group where we explore frontend stuff. This blog was theme for the august 2021 meetup.

We used this content as a starting point. Paired up for pairprogramming using VsCode Live Share. Task is to add new features to the code, a new list, and a new detailspage of choice (Product or something else).

You will find the project at Github: https://github.com/magneka/MockServiceWorkerMeetup

Webassembly Tutorial using Emscripten

Inspiration

At NDC conferences Steve Sanderson had an impressive talk called Web Apps can’t really to *that* that I would highly recommend.  He showed an experimental .Net runtime compiled into a webassembly, enabling running a C# Razor based web application in the browser.  More info on his blog.

What is webassembly or WASM

Webassembly is an type of low level assembly-like language with a binary format that runs almost as fast as native applications.  You will need a compiler in some language to create the webassembly, currently there is a small number to choose from, the most commonly used is Emscripten, a LLVM based C/C++ compiler able to create Javascript asm.js format files.

Currently there are production ready compilers for C/C++, and experimental compilers for languages like Rust, C#, TypesScript, Java, Haxe, Kotlin, and Go.  In near future, I expect to see many production ready alternatives, including writing code in C#, Java, enabling code to be shared beetween front-end and back-end.

Most browsers have implemented web assembly, even on devices like iphone, android..

I decided to have a go with Emscripten, since it is production ready.

Prerequesites

Installing node.js, and create simple web server

The application needs a simple webserver.  The simplest one I know is a node.js application called http-server. If you have not installed node.js, download from https://nodejs.org/en/.  Node.js has a package manager called npm, to install the web server into your global node repository isue the first command below, second command starts the web server.

npm install http-server -g
http-server

Note that http-server, will serve anything from current directory and below.

Installing the Emscripten C++ compiler

Download Emscripten from this site:
https://kripken.github.io/emscripten-site/docs/getting_started/downloads.html

In the root of the folder you install the compiler, you will find a bat file (or shell script, depending on your operating system) to set up paths to compiler, include files and other stuff needed to compile.

A simple application

To check out Webassembly, I decided to try to create a simple application, where all logic happens in C++ in the webassembly code (no javascript).  I created simple HTML form with ID, Name and Address fields, and buttons to load and clear form fields.

I would then need to figure out how to do following operations from C/C++

  • Getting strings from HTML form controls
  • Setting value on form control
  • Doing async ajax call to fetch data
  • Parse json files to extract data
  • Create C/C++ events on the HTML buttons
  • Create a simple HTML file

Last things first:

Create a simple HTML file

I created a simple HTML file with three fields and two buttons.  Note the script tag to include the javascript loader for the webassembly binary file.  The javascript loader and the webassembly binary are both created during compilation.

<!DOCTYPE html>
<head>
  <meta charset="utf-8">
  <title>WebAssembly Example</title>
</head>
<body>

  <h2>WebAssembly Example</h2>
  id <br>
  <input id="id"   name="id" size="15" type="text" /> <br>
  Name <br>
  <input id="name"   name="name" size="15" type="text" /> <br>
  Address <br>
  <input id="address" name="address" size="15" type="text" /> <br>
  
  <br><br>
  <input id="btLoad" name="Load" type="submit" value="Load" />
  <input id="btClear" name="Clear" type="submit" value="Clear" />
  
  <!-- Include the JavaScript glue code. -->
  <!-- This will load the WebAssembly module and run its main. --> 
  src="test_html5.js">
 
</body>
</html> 


Create C/C++ events on the HTML buttons

The code below shows how to set assign a callback function to a button with specific Id.

int main()
{
  emscripten_set_click_callback("btLoad", (void*)0, 0, on_load_click);
  emscripten_set_click_callback("btClear", (void*)0, 0, on_clear_click);
  
  // To avoid exit after leaving main(), keeping events alive.
  EM_ASM(Module['noExitRuntime'] = true);
  
  return 0;
}

Parse json files to extract data

To parse json data from a server (typically a rest api), I chose to use Niels Lohmann’s JSON for Modern C++. This is hosted at github: https://github.com/nlohmann/json.  I preferred this because it is simple to use, and everything is hosted in one file: json.hpp.  C or C++ is not my first programming language, and he have done a brilliant job making his library easy to use with operator overloads, and helpers.

As you can see from code below, a one liner is enough to parse the json string, and another oneliner to read a node.

I do not have a black belt in C/C++,  and I am not sure all the string handling is done in an optimal manner.  However it seems that the returned string is not null terminated, so sometimes my program crashed.  I did a kludge to add a zero at the end, it now seems stable, but should probably incremented the buffer before adding the zero.

void DisplayFetchedData(emscripten_fetch_t *fetch)
{
  // Null terminates data, dodgy, may overwrite something in memory
  ((char*)fetch->data)[fetch->numBytes]='\0';
    
  printf ("%s\n", fetch->data);
  auto j4 = json::parse(fetch->data);
  setInput("id", j4["id"]);
  setInput("name", j4["name"]);
  setInput("address", j4["address"]);
}

Doing async ajax call to fetch data

Emscripten_Fetch api will do ajax calls for you.  Note you set up two callbacks, one for success, and one for error.   I have done this in a button click event.  I created two json files (data1.json and data2.json) just to simulate a rest api.

void downloadSucceeded(emscripten_fetch_t *fetch) {
  printf("Finished downloading %llu bytes from URL %s.\n", fetch->numBytes, fetch->url);    
  DisplayFetchedData(fetch);  
  emscripten_fetch_close(fetch); // Free data associated with the fetch.
}

void downloadFailed(emscripten_fetch_t *fetch) {
  printf("Downloading %s failed, HTTP failure status code: %d.\n", fetch->url, fetch->status);
  emscripten_fetch_close(fetch); // Also free data on failure.
}

int on_load_click(int eventType, const EmscriptenMouseEvent *mouseEvent, void *userData)
{
  char* jsonUrl;
  asprintf(&jsonUrl, "/HTML5Api/data%s.json", getInput("id").c_str());

  emscripten_fetch_attr_t attr;
  emscripten_fetch_attr_init(&attr);
  strcpy(attr.requestMethod, "GET");
  attr.attributes = EMSCRIPTEN_FETCH_LOAD_TO_MEMORY | EMSCRIPTEN_FETCH_REPLACE;
  attr.onsuccess = downloadSucceeded;
  attr.onerror = downloadFailed;
  emscripten_fetch_t *fetch = emscripten_fetch(&attr, jsonUrl);   

  return 0;
}

Setting value on HTML Control

To access the DOM, use the val.h.  Documentation says this is under construction. I’m not sure if it means that the library or documentation is under construction.

void setInput (std::string fieldname, std::string value )
{
  val document = val::global("document");
  val elem = document.call<val>("getElementById", std::string(fieldname));                    
  elem.set("value", value);
}

Getting string from HTML form control

Setting a value on the DOM is done in a similar way.

std::string getInput (std::string fieldName) 
{
  val document = val::global("document");
  val value = document.call<val>("getElementById", fieldName)["value"];
  return value.as<std::string>();
}

Compiling the program

To compile the program i used the following command:

emcc --bind test_html5.cpp -s FETCH=1 -s WASM=1 -O3 -o test_html5.js

Compiling will generate two files, a javascript loader and a wasm binary.

Running the program

If you have the web server up and running, you may point your browser to the location where you have your source (note that I have a subdirectory below where i started the web server).

Enter 1 or 2  in the id field, and press load, and it will load the corresponding json file that simulates a rest api.

WASM
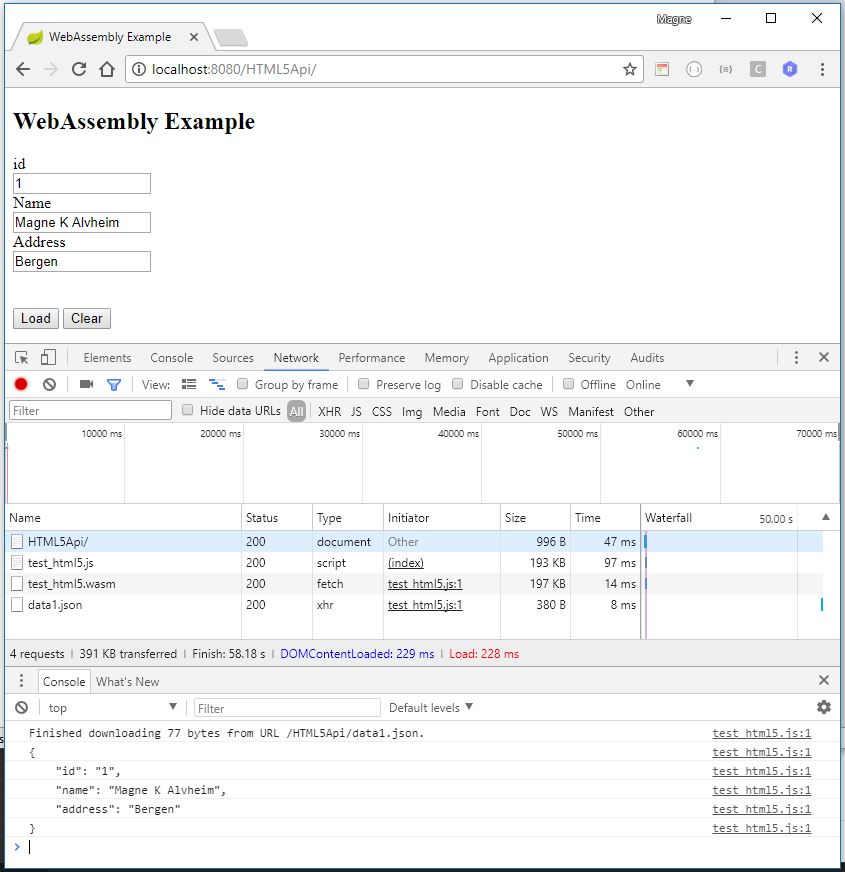
As you can see, it loaded the wasm file,  retrieved the data1.json file and populated the form fields.

Summary

This is probably not a typical use case for a webassembly. In a near future there will probably be better tools for compiling different languages and api’s (like the dotnet api in Blazer).  But if you have a large C/C++ application that needs performance, and you want to Webify it, this may be a way to go.  There are some graphical applications, games and even operating systems ported to web using Enscripten/wasm.

There are not many sites with examples for Emscripten and WASM online, so it took me a lot of digging and experimenting to create this small application.

The entire project is hosted on my Git site: at https://github.com/magneka/Wasmtutorial

Creating a Node.js webserver with Sqlite

Node.js is a framework for creating applications in Javascript.  It has a reputation for being blazingly fast, and having an incredible number of modules for anything you may desire. It also works on any major operating system.   I have not yet worked with Node.js, but I decided to have a closer look at how to create a web application with Node.js.

A super quick introduction

Node.js is downloaded from https://nodejs.org.  There are many ways to install, depending on operating system and other preferences, but when installed, you can run node, and the node package manager npm.  The package manager npm works a bit like nunit, maven, cpan and others, it can download dependencies, and set up your project.  It has a vast array of packages for you to use, seems like everything is open software.

To get started, I downloaded and installed Node.Js. I created a new subdirectory called “Simple”, and created a small file called firstWebserver.js as below.  The function will be called upon each request on localhost:3000.

var http = require('http');

http.createServer(function (req, res) {
   res.writeHead(200, {'Content-Type': 'text/plain'});
   res.end('Hello World from a Node.js webserver\n');
}).listen(3000, '127.0.0.1');

console.log('The server is up and running at http://127.0.0.1:3000/');

To run it, enter the command node firstWebserver.js and point your browser to localhost:3000 as shown below.

Screen Shot 2017-03-08 at 14.19.48

Running the firstServer.js application

Voila, we have a webserver up an running, it does not do much, it can not serve files or anything, but it communicates with the browser.

A web server that actually serves files

To make the server serve files, we can use one of the popular node modules, Express.js.  Express will let us serve files, creating API and a lot more. We need to download the module, and we can do that using the command

npm install express

The node package manager will download Express.js and all its dependencies to a subdirectory.  Lets create a file named secondWebserver.js like below

var express = require('express');
var app = express();

app.use(express.static('wwwroot'))

app.listen(3000);

Create a folder wwwroot with the file basic html file called index.html. Add a img tag to the image like below

..</pre>
<h1>Hello world</h1>
<pre>
<img src="/images/barcelona.jpg" alt="Barcelona" />
..

Create a folder subfolder images, and put a image in it. We can now run the application with the command

 node secondWebserver.js

Point the webserver to localhost:3000

You should now see the index page with image in it like this

Screen Shot 2017-03-08 at 14.18.09

Running secondWebserver.js serving index.html and an image file.

Adding SQL server and creating the API

To create a useful application we need a database. In this example I will use Sqlite.  This is a tiny SQL database with no need for any installation of any server software.  It creates data in a single file.  There is a SQL browser called SqliteBrowser for running queries to a Sqlite database file, wich can be handy for creating tables, checking content etc.

First we need to install modules for node.js, Sqlite3 is the database, and body-parser is used by Express for creating a json.  Note the -s parameter, wich updates a json file in your projects root directory,  so you can restore all modules by one command, npm install.

npm install -s sqlite3
npm install -s body-parser

I used the SqliteBrowser to create a file like below, this is is the Employees table from the Northwind database often used in Microsoft examples.  Created the file in a subdirectory called Db.

CREATE TABLE [Employees] (
[EmployeeID] INTEGER PRIMARY KEY AUTOINCREMENT,
[LastName] TEXT,
[FirstName] TEXT,
[Title] TEXT,
[TitleOfCourtesy] TEXT,
[BirthDate] DATE,
[HireDate] DATE,
[Address] TEXT,
[City] TEXT,
[Region] TEXT,
[PostalCode] TEXT,
[Country] TEXT,
[HomePhone] TEXT,
[Extension] TEXT,
[Photo] BLOB,
[Notes] TEXT,
[ReportsTo] INTEGER,
[PhotoPath] TEXT,
FOREIGN KEY ([EmployeeID]) REFERENCES [Employees] ([EmployeeID])
ON DELETE NO ACTION ON UPDATE NO ACTION
)

Now we can modify the server.js like this:


// Fast html framework
var express = require('express');
var app = express();

// For receiving JSON in posts
var bodyParser = require('body-parser');
var jsonParser = bodyParser.json()
var urlencodedParser = bodyParser.urlencoded({ extended: false })

// For the database
var sqlite3 = require('sqlite3');
var db = new sqlite3.Database('./db/MyDb.db');

// Add restful controller
require('./EmployeeController')(app, db, jsonParser);

// Serve static files
app.use(express.static('wwwroot'))

app.listen(3000);

Note the three lines of bodyParser code we need for json, and below two lines for setting up database.  Database is located in ./db/ directory.  When this is done, we may add a restful controller handling Employee requests.

module.exports = function(app, db, jsonParser){

    var fields = ["EmployeeID", "LastName", "FirstName", "Title", "TitleOfCourtesy",
                  "BirthDate", "HireDate", "Address", "City", "Region", "PostalCode",
                  "Country", "HomePhone", "Extension"];

    console.log("Registering endpoint: /api/employees");

    app.get('/api/employees', function(req, res){
        console.log("SELECT " + fields.join(", ") + " FROM employees");
        db.all("SELECT " + fields.join(", ") + " FROM employees", function(err, rows) {
            res.json(rows);
        });
    });
}

note that the first line module.exports, corresponds with the require line in the server file.

I put the fields i want to use in an array, wich allows me to create a select statment joining with a “, “.

Running the Web server now:

node secondWebserver.js

and point your browser to:

http://localhost:3000/Api/Employees

And it will look like below provided there is data in the database (it is in the github verson of the project).

Screen Shot 2017-03-09 at 13.49.54

Finally – Consuming the API

The last bit is to consume this API and display data in a nice way.  For this i started a generic proxy class for crud operations.  In this project there is only the method for getting the list, if requested I may create another blog article on that.

So I made a new javascript file ./wwwroot/javascript/AjaxProxy.js

I decided to make a method taking two callback methods as arguments, one for i.e. populating a table, and one for handling errors. Constructor takes the uri for the api as an argument.

I have used toastr.js library for debugging. It shows a message for a while, and is a great alternative to writing to the browser console.

function ajaxProxy (ajaxUrl) {
    var self = this;
    this.ajaxUrl = ajaxUrl;  

    // -------------------------------------------
    // Method for populating table from json object
    // -------------------------------------------
    self.PopulateTable = function (populateHandler, handleError) {

        toastr.info("Calling GETI in api: " + self.ajaxUrl);

        // Get employee from server
        var lAjaxString = self.ajaxUrl;
        jQuery.ajax({
            url: lAjaxString,
            type: 'GET',
            dataType: "json",
            contentType: "application/json; charset=utf-8",
        })
        .done(function (data) {
            toastr["success"]("Number of records retrieved:" + data.length);
            populateHandler (data)
        })
        .fail(function (data) {
            toastr["error"]("Error:" + JSON.stringify(data));
            handleError(data);
        });
    }
};

Now we need a javascript file for consuming this for the employeeList.

var ajaxForm = new ajaxProxy("/api/employees")                              

document.addEventListener("DOMContentLoaded", function(event) {
    ajaxForm.PopulateTable (jsonToTable, handleError);
});      

function handleError (data) {
    $("#ajax-error-box").modal('show');
    $("#ajax-error").text("Errorcode:" + data.status + ", Message:" + data.statusText);
    console.log(data);
}

function jsonToTable (data) {

    // Clear table
    $('#employeeTable tr').slice(1).remove();

    //if no tbody just select your table
    var tbody = $('#employeeTable').children('tbody');
    var table = tbody.length ? tbody : $('#employeeTable');

    var tableString = "";

    for(var i in data) {
        var employee = data[i];

        tableString += "" + employee.EmployeeID
                    + "" + employee.Title
                    + "" + employee.TitleOfCourtesy + " " +  employee.FirstName + " " +  employee.LastName
                    + "" + employee.Address + " " +  employee.City + " " +  employee.PostalCode + " " +  employee.Region
                    + "

";
    }
    table.append(tableString);
}    

// Form event handlers
$('#refresh').click(function(){
    $("#ajax-error-box").hide();
    ajaxForm.PopulateTable (jsonToTable, handleError);
});

In the HTML file, I added a little bootstrap to improve the looks of the table.  Running this we get this result

Screen Shot 2017-03-10 at 10.41.53

Conclusion

With a very few lines of code, we were able to create a self contained web server with a JSON API, retrieving data from a SQL server.  I did not have to install any bloated development environment. I only needed a commandline and a simple editor.  It will run on any operating system, can be deployed on anything from a Raspberry PI to Heroku or Azure.

If you want more sophisticated debugging, I would recommend Visual Studio Code, which also runs on Windows, Macs and Linux machines.  For more advanced projects, there are several rendering engines available.  If you want to do MVC like ASP/Razor, no problem. If you dont want to write any HTML, no problem.  If you want to set up a line of frontend building tools, also no problem.

This project is available as a Github project here https://github.com/magneka/SimpleNodeJs.  Checkout project and run the commands

npm install
node server.js

All dependencies will be restored, and server is started.

Knockout.js tutorials in typescript

Typescript

Some days ago a client stated that typescript was now a defacto standard for Front-End Development.  He claimed that if doing it with javascript, we would regret later.  Well, I personally know several seasoned front-end programmers who are perfectly happy with javascript, but i also know a lot of people who are not. For this last category there seems to be a lot of alternative compilers that generates javascript source code from more or less object oriented languages, like CoffeScript for the Ruby enthusiasts and surprisingly many others.  Look here for a more complete  list of languages that compiles to javascript.

Knockout.js

Knockout.js is a javascript library that implements the observer pattern on web pages. Basically this makes it possible to bind a variable (a class method or property) to a html element.  (Just like Visual Basic and Delphi once allowed us to magically do in Windows forms applications.  Seems a lifetime ago now…) When the variable is updated, all html elements are automatically updated.

Knockout has some brilliant tutorials on their homepage.  So i decided to try to implement the first tutorial in Typescript to check it out.  In the github project, you will find all stages of the tutorial added as separate files (Example1-4).

Installing

Any way, i decided to take a look at TypeScript, and found a tutorial, and started installing on my Macbook.  I decided to go for MicroSoft Visual Studio Code on my Mac, but it can easily be done inside Visual Studio on Windows.  A few sudo npm …. commands, and I was up and running.

My TypeScript project has a directory structure like this:

  • src – contains typescript source code
  • built – contains the generated javascript code
  • css – well, css files.  I have one for the toastr library
  • externals – contains the javascript libraries you want to use
  • typings – a kind of include files with definitions

Knockout Intro tutorial

The intro tutorial when complete, is a simple web form bound to a viewmodel.  The viewmodel has two properties for firstName, and lastName.  These are bound to pure text and input controls.  When changing text in a input control, all references to this field is updated when cursors leaves the form.

There is a computed field called fullName, concatenating first and lastname.

Finally there is a button that calls a function that capitalizes the lastname calledcapitalizeLastName.

The final stage HTML code looks like this:

<!DOCTYPE html>
<html>
<head>
<meta charset="UTF-8" />
<title>nockout introduction - step 4 - final version</title>
</head>
<body>
<p>First name: <strong data-bind="text: firstName"></strong></p>
<p>Last name: <strong data-bind="text: lastName"></strong></p>
<p>First name: <input data-bind="value: firstName" /></p>
<p>Last name: <input data-bind="value: lastName" /></p>
<p>Full name: <strong data-bind="text: fullName"></strong></p>
<button data-bind="click: capitalizeLastName">Go caps</button>
<script src="./externals/require.js"></script>
<script src="./built/require-config.js"></script>
<script>
require(["built/example4"]);
</script>
</body>
</html>
view raw example4.html hosted with ❤ by GitHub

Typescript code

And now for the real thing.  Having never coded a Typescript statement before, i relied heavily on Google, and ended up with this code:

import * as ko from "knockout";
class Example4ViewModel {
firstName: KnockoutObservable<string>
lastName: KnockoutObservable<string>
fullName: KnockoutComputed<string>;
capitalizeLastName () {
this.lastName(this.lastName().toUpperCase());
}
constructor(firstname: string, lastname: string) {
this.firstName = ko.observable(firstname);
this.lastName = ko.observable(lastname);
this.fullName = ko.computed(() => {
return this.firstName() + " " + this.lastName();
});
}
}
ko.applyBindings(new Example4ViewModel("Bert", "Bertington"));
view raw example4.ts hosted with ❤ by GitHub

Some comments to the code:

  • Line1: We need to import the Knockout library
  • Line3: We declare a class Example4Viewmodel for the viewmodel
  • Line4 and 5:  We declare simple string properties for binding, declaring with KnockoutObservable<string>
  • Line 14 and 15.  The simple string properties, must be set to ko.observable(“initial value”).  We set them to values of the parameters passed into constructor.
  • Line 7 and 17-19. We declare a computed property as KnockoutComputed.  In the class constructor we implement the method.
  • Line 9-11: The button click event capitalizeLastName is an ordinary function, updating this.lastName to all CAPS.

Compiling

Compiling is done by issuing the command TSC on command line.

Debugging

Debugging had me impressed.  When using developer tools in Chrome, i expected to debug the generated javascript code, but to my suprise, i debugs the Typescript code.  You may set breakpoints and watches, like you can see below.

Screen Shot 2016-06-19 at 14.44.37

I expect even better debugging in Visual Studio, but have not tried that yet…


Toastr

I have included toastr.js in my project.  This is a library that pops up small windows for a short time.  Brilliant for debugging purposes.  To use include import * as toastr from “toastr” on top of viewmodel, and call toastr.info(“message”).

Configuring

There are a couple of files to be setup before we can compile.

The file tsconfig.json contains source code files to be compiled.  So when adding new typescript files, add them here.

{
"compilerOptions": {
"outDir": "./built/",
"sourceMap": true,
"noImplicitAny": true,
"module": "amd",
"target": "es5"
},
"files": [
"./typings/index.d.ts",
"./src/require-config.ts",
"./src/example1.ts",
"./src/example2.ts",
"./src/example3.ts",
"./src/example4.ts"
]
}
view raw tsconfig.json hosted with ❤ by GitHub

the file require -config.ts contains named reference to javascript libraries, and defines dependencies.

declare var require: any;
require.config({
paths: {
"knockout": "externals/knockout-3.4.0",
"jquery": "externals/jquery-2.2.4",
"toastr": "externals/toastr"
},
shim: {
jquery: {
exports: '$'
},
toastr: {
deps: ['jquery'],
exports: 'toastr'
}
}
});

In javascript we just include libraries in the html file, but typescript needs to know about the libraries at compile time.  We also only have to add references to require.js in the HTML file like this:

<script src="./externals/require.js"></script>
<script src="./built/require-config.js"></script>
<script>
require(["built/example1"]);
</script>

Github repo

The project can be dowloaded from Github.

Further work

Next i converted the next tutorial on knockout, which caused a lot more googling before i had it working,  on request, I may post this…